Advertising on Facebook is becoming more and more sophisticated to the point that you now have many different options to help you build your audience, get followers attention and drive traffic to your website.
If your goal from advertising on Facebook is to drive website traffic and conversions, then installing and taking advantage of Facebook Pixel is a must.
What is Facebook Pixel
The Facebook Pixel is a piece of code that you install on your website. It allows you to more effectively measure the performance of your ad campaigns and it helps you determine exactly who sees your ads.
The features and benefits of Facebook Pixel include:
- Ability to track customers across devices
- More effective targeting
- Create custom audiences for retargeting
- Uncover niche segments that are similar to your current ones
- Dynamic remarketing of ads – people who visit your site will see your ads on Facebook
- Audience insights
Getting started with Facebook Pixel
To install Facebook Pixel, go to the link below to create your Facebook Pixel.
https://www.facebook.com/ads/manager/pixel/facebook_pixel
Facebook Pixel Set Up
There are 2 types of code you have to install on your site to complete this process.
- The first is the pixel base code that goes on all of your pages.
- The second is the event code which you place on certain pages that you want to track specifically.
Creating Your Facebook Pixel
Facebook is going to step you through a process to set up your pixel and to get the codes for your site.
![]()
Installing Facebook Base Pixel on Your Website
The next step is to choose which method you want to use to install the Pixel on your site:
1. Using a tag manager
2. Copy and paste the code
In order for your Pixel to work, you must copy and paste the code into your website. This cookie allows your site to send information back to Facebook and measures visits and where people go on your site.
We prefer to copy and paste the code into the website rather than using a tag manager because that way you have more control over things that can go wrong but if you are not familiar with the code of your site you might want to go with the first option. There are also several WordPress plugins that facilitate this.
![]()
Facebook generates a handy dandy Facebook Pixel ID and instructions to send to your webmaster. The code has to go on every page of your site for it to work properly. The best way to do this is to install it in your header file somewhere between the <header> and </header> and before the <body> tag.
![]()
Pixel Events Code
- Basic – lets you track events and optimize for conversions based on people who take action on your site.
- Recommended – includes all of the above along with basic parameters providing additional data and measurement parameters.
- Advanced – adds an extra layer to include product level granularity (i.e product type, style).
- View content
- Search
- Add to basket
- Add to wishlist
- Initiate checkout
- Add payment info
Make purchase - Lead
- Complete registration
Once these pieces of code have been installed on your site you will get a Facebook notification.
![]()
You can check to see if your Pixel is working by going to your Facebook Ads Manager. There you will notice a new Pixel tab.
![]()
Click on it to see your Pixel Fires (total amount of pixel activity in the date range).
![]()
To troubleshoot or validate your Pixel set up, there’s a useful Chrome add-on called Facebook Pixel Helper.
![]()
Facebook Pixel Next Steps
Now that you’re all set up with Pixel, it’s time to create audiences and track conversions.
Create Audience
This allows you to target your Facebook ads to audiences of people who have visited your website and lets you remarket to them.
From your Facebook Ads Manager click on Pixel then on the ‘Create Audience’ button. Audience options include: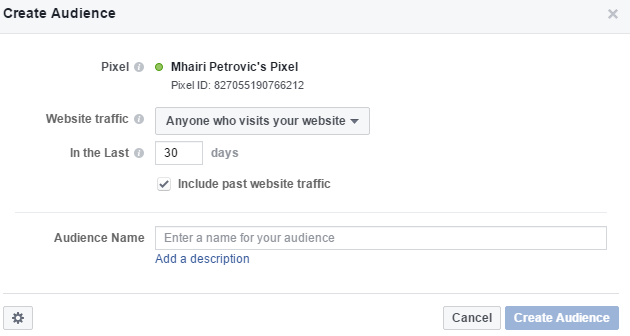
• Anyone who visits your site
• People who visit specific pages
• People who visit specific pages but not others
• People who have visited in a certain amount of time
• Or, you can create your own custom combo.
Decide which option best fits your needs, name your audience and that’s it. You are ready to create your first remarketing ad on Facebook but first, you have to wait till your custom audience is big enough.
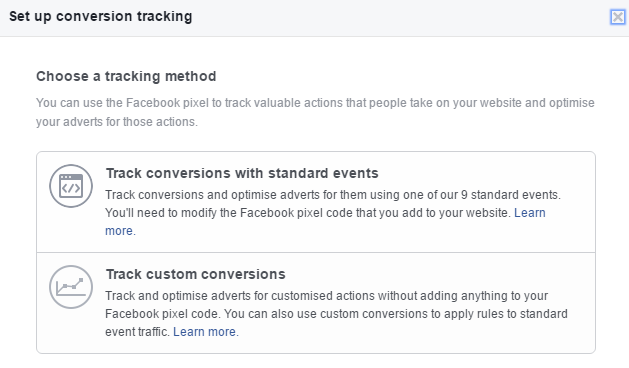
Create Conversion
From your Facebook Ads Manager, click on Pixel then again on the ‘Create Conversion’ button.
This time you have 2 options:
- Track conversions with standard events – use this if you simply want to track and optimize conversions and build your audience.
- Track custom conversions – use this if you can’t use standard events on your site or if you want to split conversions on your site.
Related articles and resources on Facebook Pixel: